![Primary Logo png-Dec-18-2023-02-56-38-8732-AM.png]](https://kb.cnstreasury.com/hs-fs/hubfs/Primary%20Logo%20png-Dec-18-2023-02-56-38-8732-AM.png?height=50&name=Primary%20Logo%20png-Dec-18-2023-02-56-38-8732-AM.png)
Why do we designate FX contracts?
FX contracts are designated for hedge accounting to manage currency risk and reduce financial statement volatility. By formally linking an FX contract to a specific exposure—such as a future payment or revenue—companies can ensure that gains or losses on the hedge offset fluctuations in the underlying transaction. This alignment with hedge accounting standards provides a more accurate reflection of financial performance, preventing misleading volatility and improving transparency in financial reporting.
Automated Designation
-
If your subscription includes automation, all FX contracts are automatically designated, and no manual action is required.
Manual Designation Methods
Method 1: Designate at Trade Date
-
Navigate to the Trade Details Screen
-
Go to FX View Data → View Currency Deals → Spot/Fwd.
-
Locate the FX contract in the grid.
-
Click the vertical ellipses (⋮) under the Action column and select Edit.
-

2. Enter Designation Details
-
Scroll to the bottom of the trade details screen.
-
Fill in the following fields:
-
Strategy – Select the hedge accounting strategy the trade is tied to.
-
Designation – Select Yes to designate the trade.
-
Risk – Enter the month and year of risk exposure (e.g., Aug/2025 if the trade settles in August 2025).
-
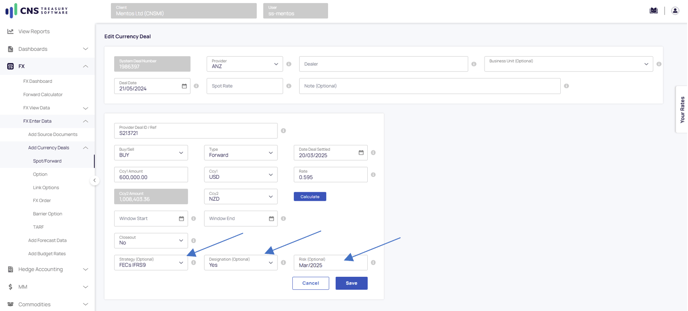
3. Save the Designation
-
-
Click Save to apply the designation.
-
Note: This method only allows designation at the original trade date.
Method 2: Designate at a Custom Date
-
Navigate to Hedge Accounting Data
-
In the menu, go to Hedge Accounting → HA View Data → View FX.
-
Locate the FX contract in the grid - you will see which contracts are designated or not in the grid under the columns HA Strategy and Designated Balance.
-
Click the vertical ellipses (⋮) under the Action column and select Designate.

-
-
Enter Designation Details
-
Select the Strategy.
-
Enter the Risk period (e.g., Aug/2025).
-
Set the Designation Date (this can be different from the trade date).
- Enter in the Designated Amount
- (Optional ) Enter in a Designation Note

-
-
Save the Designation
-
Click tick to finalise the designation.
- Click the X to Cancel your entry.
-
Note: This method provides flexibility to designate the trade at a custom date rather than being restricted to the trade date.