![Primary Logo png-Dec-18-2023-02-56-38-8732-AM.png]](https://kb.cnstreasury.com/hs-fs/hubfs/Primary%20Logo%20png-Dec-18-2023-02-56-38-8732-AM.png?height=50&name=Primary%20Logo%20png-Dec-18-2023-02-56-38-8732-AM.png)
Step 1: Access the Data Entry Screen
- In the left-hand menu, expand FX.
- Navigate to FX Enter Data → Add Source Documents.
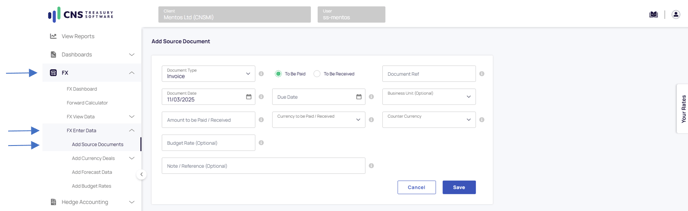
Step 2: Enter an Exposure
- Select the document type: Choose Invoice, Order, or Credit Note.
- Choose the Direction: Indicate whether the exposure is To be Paid or Received.
- Enter a Reference: Provide a unique reference for the exposure.
- Select the Document Date: Specify the date the document was issued.
- Select the Due Date: Indicate when the payment is due.
- (Optional) Select the Business Unit: Assign the exposure to a specific internal entity.
- Enter the Notional Amount: Input the principal amount of the exposure.
- Select the Notional Currency: Choose the currency being paid or received.
- Select the Counter Currency: Specify the currency of the counterparty.
- (Optional) Enter the Budget Rate: Input an internal benchmark rate if applicable.
- (Optional) Add a Note / Reference: Include any additional details for tracking.
Final Steps
- Click Save to complete the data entry.
- Click Cancel if you want to exit without saving.